Skip to content

Installation

Install Scrypted using the one of the Installation options.

After installation, the Scrypted NVR can be installed from the Plugins section of the Scrypted Management Console.

Purchase and Manage Subscription

This Scrypted NVR Plugin is in a paid public beta. A live demo server and free trial is available to test the product.

  1. Visit to the billing portal and login to purchase a subscription. Return to the billing portal at any time to upgrade or cancel the subscription.
  2. Login to the Scrypted NVR Plugin using the same login account from the billing potral. The plugin's
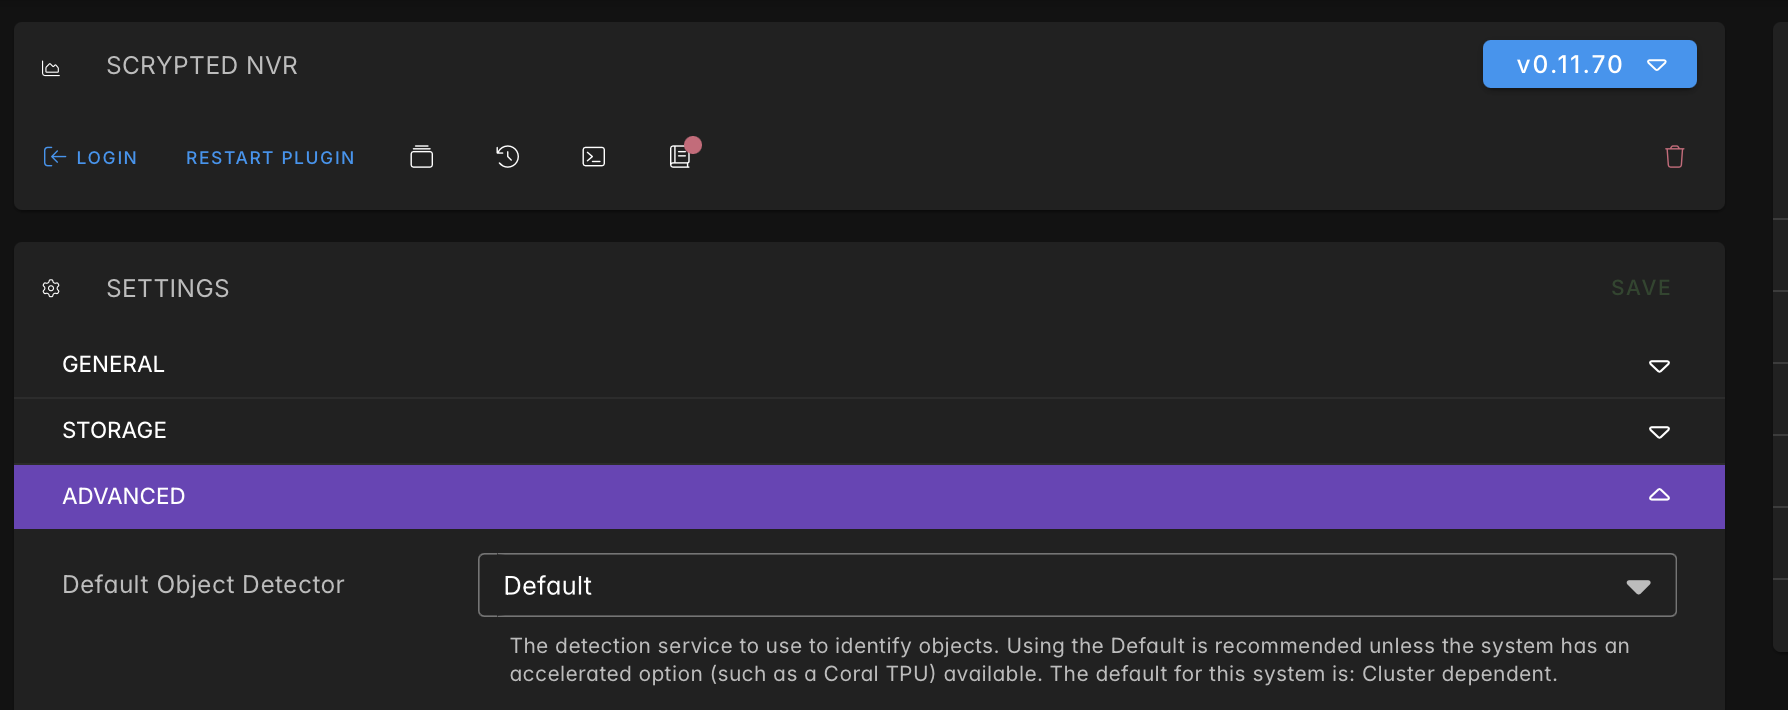
 Login button can be found at the top of the Scrypted NVR plugin page within the Scrypted Management Console.

TIP

Scrypted NVR on Mac and Windows must Install or Migrate to the Desktop Application.

Recording Storage

Scrypted NVR requires a drive that can store at least 3 days of video for the cameras in the system. The storage requirement will vary based on the camera count and camera resolution. The following table provides a rough estimate for one week retention with a given number of cameras.

Resolution4 Cameras6 Cameras10 Cameras16 Cameras
1080P1TB1TB1.5TB2.4TB
2K1.2TB1.8TB3TB4.8TB
4K2.4TB3.6TB6TB9.6TB

Drive Setup

Use an appropriate filesystem for your OS. The storage drive must not be MS-DOS/FAT formatted. For best performance, provide an entire disk or partition to Scrypted NVR. Volumes that share disk space other is not recommended as it may cause issues with recording retention periods.

OSFilesystem
macOSHFS or APFS
WindowsNTFS
Linuxext4

WARNING

When the storage device is a NAS Share, ensure that the NAS Recycle Bin feature is disabled, or the old recordings can not be properly deleted by Scrypted NVR and the disk will fill up.

WARNING

Scrypted NVR will not work with filesystem quota features. Use a separate filesystem partition to restrict how much space is available.

Directory Configuration

The recordings storage directory can be configured within the Scrypted NVR Plugin Settings. Multiple Storage Devices can also be added.

Servers running in Docker will need to mount this path into the container.

Camera Setup

  1. Configure the Camera.
  2. Add the Camera to Scrypted.
  3. Verify the Motion Sensor is working. Scrypted waits for the camera to report motion to trigger video analysis.

WARNING

If the Camera's Motion Sensor is disabled, detections will be unavailable on the NVR timeline.

  1. Enable Recording in the Camera Settings by selecting Scrypted NVR in the Integrations and Extensions list.

Cameras and Recordings

After the Scrypted NVR Plugin has been installed, Cameras and Recordings can be viewed on your local network by visiting the address of this Scrypted server.

Cloud access must be enabled for remote access via browser, iOS, Android, and Desktop Apps.

Proxmox VE Volume

Proxmox VE can add a storage device to Scrypted through the Proxmox VE web interface. There are a few steps: adding the storage to Proxmox VE, assigning storage to the Scrypted container in Proxmox VE, and then configuring Scrypted NVR Plugin to use that storage.

Add Storage to Proxmox

  1. Open the Proxmox VE web interface.
  2. Select the server (aka node) from the Datacenter drawer on the left.
  3. Select the Disks section in the secondary drawer.
  4. Find the Device in the list. The disk's Device will typically be something like /dev/sda or /dev/sdb.
  5. Click Wipe Disk.
  6. Select the LVM section in the secondary drawer.
  7. Click Create: Volume Group.
  • Use all available storage when creating this LVM/partition.
  • Name the new storage something recognizable like nvr-storage.

Add Storage to Scrypted

  1. Select the scrypted container from the drawer on the left.
  • Shutdown the container.
  1. Click the Resources section in the secondary drawer.
  2. Click Add -> Mount Point.
  3. Change the Storage setting to the previously named device (nvr-storage).
  4. Set the Path to /nvr.
  5. Uncheck Backup.
  6. Set the Disk Size to the full size of the disk.
  7. Click Create.
  • Start the container.

Configure the Scrypted NVR Plugin

  1. Open the Scrypted Management Console.
  2. Navigate to the Scrypted NVR Plugin.
  3. Set the NVR Recordings Directory to /nvr.

Storage setup is now complete.

Docker Volume

Use the Quick Setup script to format a drive or use an existing directory in Scrypted NVR. Manual Docker Setup steps are also available.

Quick Setup

Run the following to download the script:

sh
mkdir -p ~/.scrypted
curl -s https://raw.githubusercontent.com/koush/scrypted/main/install/docker/setup-scrypted-nvr-volume.sh > ~/.scrypted/setup-scrypted-nvr-volume.sh

If a recording directory is already formatted and mounted, follow the steps at Existing Storage Directory. Otherwise continue on to formatting a New Disk.

Existing Storage Directory

sh
sudo SERVICE_USER=$USER bash ~/.scrypted/setup-scrypted-nvr-volume.sh /path/to/existing/directory

The docker container will be updated and restarted with the new Recordings Directory.

New Disk

Run the following to list available disks:

sh
lsblk

The output will be similar to below:

NAME   MAJ:MIN RM   SIZE RO TYPE MOUNTPOINTS
loop0    7:0    0  63.4M  1 loop /snap/core20/1974
loop1    7:1    0  63.9M  1 loop /snap/core20/2105
loop2    7:2    0 111.9M  1 loop /snap/lxd/24322
loop3    7:3    0  53.3M  1 loop /snap/snapd/19457
loop4    7:4    0  40.4M  1 loop /snap/snapd/20671
sda      8:0    0   128G  0 disk 
├─sda1   8:1    0     1M  0 part 
└─sda2   8:2    0   128G  0 part /
sdx      8:16   0  4096G  0 disk 
sr0     11:0    1  1024M  0 rom

In the example above the 4TB storage disk is listed as sdx. To format and use sdx, run:

sh
sudo SERVICE_USER=$USER bash ~/.scrypted/setup-scrypted-nvr-volume.sh sdx

The docker container will be updated and restarted with the new disk.

Advanced Storage Options

Manual Docker Setup

  1. Edit ~/.scrypted/docker-compose.yaml.
  2. Make the highlighted changes in the yaml block below, adjust the storage directory as appropriate.
  3. Restart the container by running the following:
sh
cd ~/.scrypted && docker compose down && docker compose up -d

docker-compose.yaml

yaml
services:
  scrypted:
    environment:
      # Scrypted NVR Storage (Part 2 of 3)

      # Uncomment this line to configure the NVR plugin to store
      # recordings within the /nvr directory inside the container.
      # DO NOT MODIFY /nvr.
      # The Recordings Directory in the NVR Plugin will autopopulate
      # with /nvr (unless it was manually changed earlier).
      # The drive or network share will ALSO need to be configured in
      # Part 3.
      - SCRYPTED_NVR_VOLUME=/nvr

      - SCRYPTED_WEBHOOK_UPDATE_AUTHORIZATION=Bearer SET_THIS_TO_SOME_RANDOM_TEXT
      - SCRYPTED_WEBHOOK_UPDATE=http://localhost:10444/v1/update

      # Uncomment next 3 lines for Nvidia GPU support.
      # - NVIDIA_VISIBLE_DEVICES=all
      # - NVIDIA_DRIVER_CAPABILITIES=all

      # Uncomment next line to run avahi-daemon inside the container
      # Don't use if dbus and avahi run on the host and are bind-mounted
      # (see below under "volumes")
      # - SCRYPTED_DOCKER_AVAHI=true
    # runtime: nvidia

    volumes:
      # Scrypted NVR Storage (Part 3 of 3)

      # Modify to add the add a Recordings Directory for Scrypted NVR.
      # The following example would mount the /mnt/media/video path on
      # the host to the /nvr path inside the docker container.
      # Modify /mnt/media/video according to the server path.
      # DO NOT MODIFY /nvr.
      - /mnt/media/video:/nvr

      # Or use a network mount from one of the CIFS/NFS examples at the top of this file.
      # - type: volume
      #   source: nvr
      #   target: /nvr
      #   volume:
      #     nocopy: true

      # uncomment the following lines to expose Avahi, an mDNS advertiser.
      # make sure Avahi is running on the host machine, otherwise this will not work.
      # not compatible with Avahi enabled via SCRYPTED_DOCKER_AVAHI=true
      # - /var/run/dbus:/var/run/dbus
      # - /var/run/avahi-daemon/socket:/var/run/avahi-daemon/socket

      # Default volume for the Scrypted database. Typically should not be changed.
      - ~/.scrypted/volume:/server/volume

Multiple Storage Devices

Multiple Recording Storage directories can be added to Scrypted NVR. This can be used to improve loading performance, especially when recording a large number of cameras or recording primarily to a NAS.

Storage directories added to Scrypted NVR must be designated as either Large or Fast.

  • Large storage will store the local resolution recording (high quality).
  • Fast storage will store remote and low resolution (scrubbing, event lookup).
  • The Default Recording Storage is designated as Large.

WARNING

The Fast storage should only be used when the Large storage is a Network Attached Storage (NAS) device. Direct Attach only storage configurations should only add Large storage directories.

Multiple Recording Storage directories is not the same as RAID, but it is a form of redundancy: substreams are written to separate storage devices. If there are multiple Large or Fast disks, the Storage used for a stream will be chosen to maximize disk utilization and retention time. if a Storage device goes offline or fails will, camera (sub)streams stored on that device will be unavailable. The other (sub)streams will be available on the remaining Storage devices.

For example, if a Large disk fails, some high resolution stream will be unavailable. But the remote and low resolution recordings stored on the Fast disks are still available.

RAID Storage can be assigned to Recording Storage as a Large or Fast directory for servers that need full redundancy.

Storage Utilization

Scrypted NVR will delete recordings and potentially stop recording if the disk reaches 10% free space or only has 10GB free space remaining. This is to ensure there is sufficient space avaolable for OS updates and optimal filesystem performance (defragmentation/realloction). The system may become unresponsive if disk is filled completely, potentially by other programs writing to the disk.

For best performance, provide an entire disk or partition to Scrypted NVR. Volumes that share disk space other is not recommended as it may cause issues with recording retention periods.