Home Assistant Legacy Cards
WARNING
The documentation on this page is for the legacy Home Assistant Scrypted NVR cards that used the Webpage (iframe) card. Users are encouraged to use the new cards instead for improved performance and customization.
Card Setup
Scrypted NVR provides Home Assistant cards that feature low latency playback and two way audio. The NVR app is also deeply integrated into the Home Assistant UI.
There are several types of cards available:
- Single Camera Card
- Camera Grid Card
- Event Reel Card
TIP
Configuring multiple cameras within a single Camera Grid Card dramatically improves performance and load times.
Follow the instructions below, and then substitute the card URL appopriately.
- Open Scrypted NVR inside Home Assistant using a desktop browser.
- Navigate to the camera.
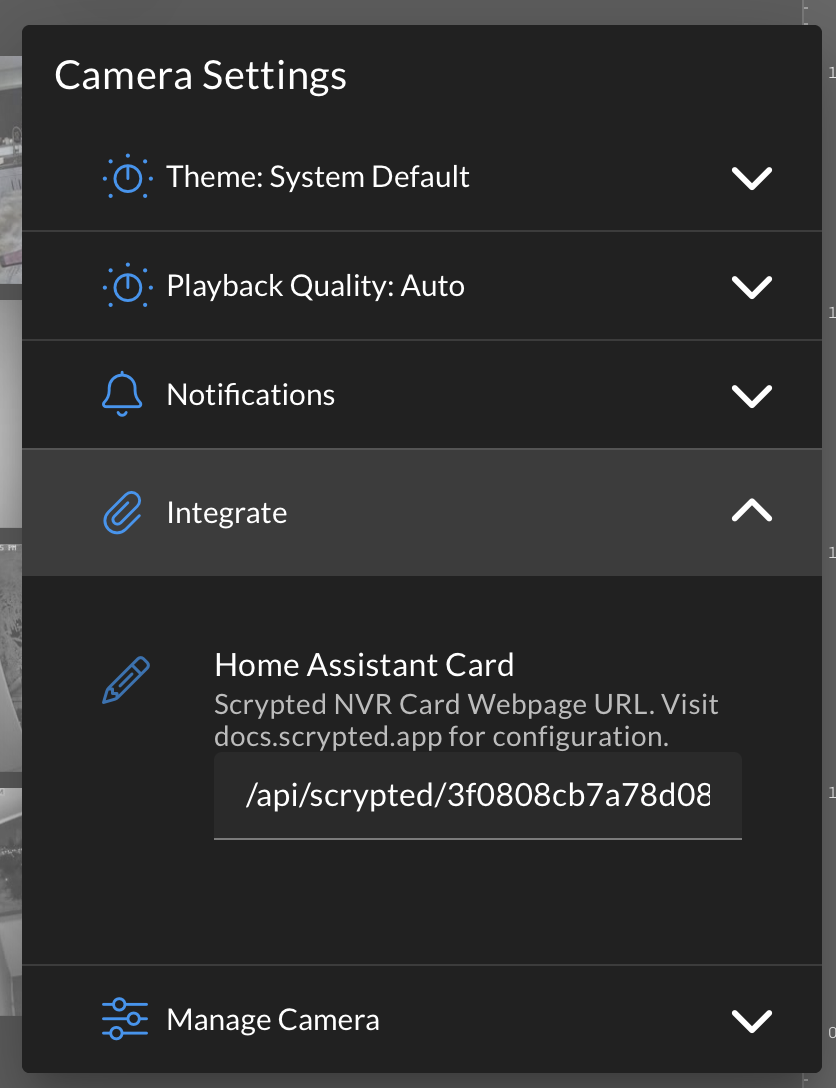
- Open the the
Camera Settings. - Copy the
Scrypted NVR Card Webpage URL. (Substitute this with Camera Grid or Event Reel URL if desired.)
WARNING
If the Home Assistant Integrate configuration is unavailable, verify the following:
- Scrypted must be opened from inside Home Assistant. The Home Assistant integration configuration is only available from inside Home Assistant.
- The Custom Component (and Addon setup, if applicable) must correctly be completed prior to setting up the cards.
- The Integration URL is available within the camera's settings reachable by clicking the settings icon under the camera playback view. Not to be confused with the primary NVR app settings.
- Add the following
Webpage Cardin Home Assistant and replace/paste the previously copiedScrypted NVR Card Webpage URLbelow:
type: iframe
url: >-
  /api/scrypted/<token>/endpoint/@scrypted/nvr/public/#/iframe/<id>
allow_open_top_navigation: true
layout_options:
  grid_columns: full
  grid_rows: 4.25
Camera Card Options
The Scrypted NVR card behavior can be configured using query string parameters on the Webpage URL.
Auto Play
Play the card video on load.
live=true
url: >-
  /api/scrypted/<token>/endpoint/@scrypted/nvr/public/#/iframe/<id>?live=true
Image Click
The parameter imageClick can be used to customize how click events are handled when the snapshot is clicked.
| Value | Description |
|---|---|
ha | Open the Home Assistant companion app when clicked. |
app | Open the Scrypted NVR app when clicked. |
none | Do nothing when clicked. |
Example: Open Scrypted NVR Timeline in Home Assistant when the still image is clicked.
imageClick=ha
url: >-
  /api/scrypted/<token>/endpoint/@scrypted/nvr/public/#/iframe/<id>?imageClick=ha
Video Click
The parameter videoClick can be used to customize how click events are handled when the live video is clicked.
| Value | Description |
|---|---|
ha | Open the Home Assistant companion app when clicked. |
app | Open the Scrypted NVR app when clicked. |
none | Do nothing when clicked. |
Example: Open Scrypted NVR Timeline in Home Assistant when the playing video is clicked.
videoClick=ha
url: >-
  /api/scrypted/<token>/endpoint/@scrypted/nvr/public/#/iframe/<id>?videoClick=ha
Resolution
By default the Card live stream will use the low-resolution stream: it loads fast, uses minimal resources, is thus best suited for a small frame. The resolution can be changed with the destination parameter. Supported destination values include low-resolution, remote, and local.
WARNING
Using the high resolution stream (local) for a Cards is not recommended, as it can cause the Home Assistant Dashboard to become sluggish with multiple cards.
destination=local
destination=remote
url: >-
  /api/scrypted/<token>/endpoint/@scrypted/nvr/public/#/iframe/<id>?destination=local
Audio
By default the Card live stream will mute both the microphone and the speaker (two way audio).
WARNING
Browsers will prevent autoplay with audio playback and microphone access prior to user interaction via a click event. The dashboard must be set to Allow on Chrome and Safari.
microphone=on
speaker=on
url: >-
/api/scrypted/<token>/endpoint/@scrypted/nvr/public/#/iframe/<id>?speaker=onµphone=onScrollable
By default the Camera Grid is not scrollable. Use the following to make it scrollable:
scrollable=true
type: iframe
url: >-
  /api/scrypted/<token>/endpoint/@scrypted/nvr/public/#/iframegrid?ids=1,2,3&scrollable=true
allow_open_top_navigation: true
Multiple Parameters
Multiple parameters may be combined using &.
url: >-
  /api/scrypted/<token>/endpoint/@scrypted/nvr/public/#/iframe/<id>?imageClick=ha&videoClick=ha&live=true
Camera Grid Card
Multiple cameras can be configured within a single Webpage Card. Configuration is similar to the single camera card, albeit a slightly different url format. The iframe url is:
| Card Type | URL Fragment |
|---|---|
| Single Camera (Reference) | ...#/iframe/<id> |
| Camera Grid | ...#/iframegrid?ids=<id1>,<id2> |
The ids parameter is a comma separated list of device ids to display in the camera grid. The grid card works best in a Panel View, but can be adjusted for Masonry View by using fixed column values.
For example:
type: iframe
url: >-
  /api/scrypted/<token>/endpoint/@scrypted/nvr/public/#/iframegrid?ids=<id1>,<id2>
allow_open_top_navigation: true
layout_options:
  grid_columns: full
  grid_rows: 9.5 # 4.25 * number of rows that will be shown
The Camera Grid card has additional parameters that can be used to used to customize the layout based on the device type and screen orientation:
| Name | Device Type | Screen Orientation | Default Value |
|---|---|---|---|
| phonePortraitCols | Phone | Portrait | 1 |
| phoneLandscapeCols | Phone | Landscape | 2 |
| tabletPortraitCols | Tablet | Portrait | 2 |
| tabletLandscapeCols | Tablet | Landscape | 3 |
| desktopMinWidth | Desktop Browser | N/A | 480 (pixels) |
| cols | All Devices | N/A | N/A |
| focus | All Devices | N/A | N/A |
Use desktopMinWidth to set the minimum width of a camera within the grid and controls the cell wrap behavior. For example, with the default value of 480, if the screen is 960 pixels, the grid will be 2 columns. If the screen is 1920 pixels, the grid will be 4 columns.
Use cols to set a fixed number of columns for all screen sizes and orientations.
Use focus to focus on cameras that have ongoing motion. When there is no activity on the selected cameras, all cameras will be shown as the default state.
Event Reel Card
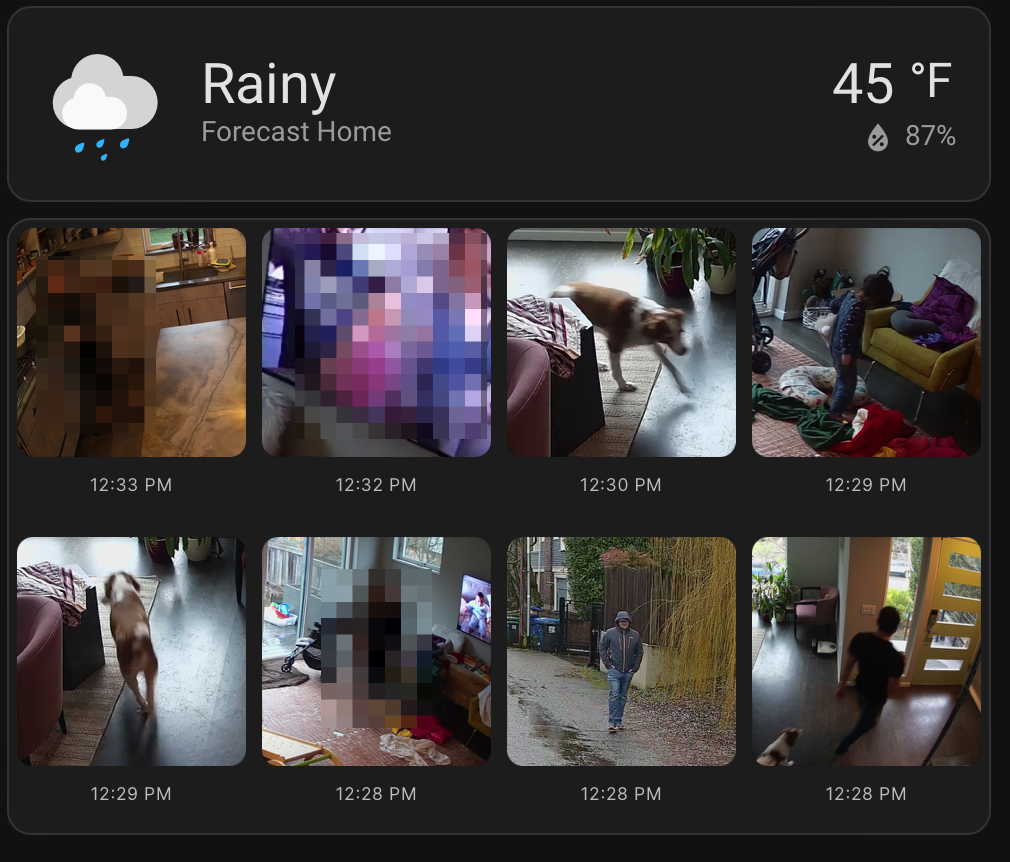
The Event Reel shows the recent highlighted events in a scrollable reel. Configuration is similar to the single camera card, albeit a slightly different url format. The iframe url is:
| Card Type | URL Fragment |
|---|---|
| Single Camera (Reference) | ...#/iframe/<id> |
| Event Reel | ...#/iframeevents?ids=<id1>,<id2> |
The Event Reel card has additional parameters that can be used to used to customize the cameras and events shown:
| Name | Default Value | Description |
|---|---|---|
| ids | All Cameras | The camera ids shown in the reel. The ids parameter is a comma separated list of device ids to display in the camera grid. If this parameter is ommitted, all are shown by default. |
| hiddenDetections | Motion | The detection types to hide in the reel. Person, Vehicle, Animal, etc. All except generic Motion are shown by default. |
| cols | Responsive | The number of columns in the event reel. |
| count | cols | The total number of items to show in an event reel page. Can be combined with cols to create a reel with multiple rows. |
| aspectRatio | 1/1 | The aspect ratio of a detection thumbnail. |
| click | ha | The app that will be opened when clicked. Valid values include ha (Home Assistant), app (Scrypted NVR App), or none (do nothing). |
For example, for a 4x1 grid of events:
type: iframe
url: >-
  /api/scrypted/<token>/endpoint/@scrypted/nvr/public/#/iframeevents?ids=<id1>,<id2>&cols=4
allow_open_top_navigation: true
type: iframe
url: >-
  /api/scrypted/3713673acab4bdd3214e673700fe48d4/endpoint/@scrypted/nvr/public/#/iframe/41?cols=1&videoClick=ha&live=true
allow_open_top_navigation: true
layout_options:
  grid_columns: full
  grid_rows: 2.3